Build Tips
I decided that for new hovercraft builders a “Tips” page was probably a handy thing that way i can list a few of the things i thought about and found answers to during my build process.
I will however state that i currently do NOT have my craft finished therefore i can not confirm that anything stated on this page is %100 accurate but what is listed is things that i ‘believe’ to be handy and that make sense.
The NUMBER #1 tip that should really be followed to the letter is that – If your going to use the household vacuum cleaner to suck up all the dust and rubbish that the build process leaves behind then DO NOT give it to your wife covered in dust, resin, and paint. The pain that follows is not worth it 🙂
2) When mixing epoxy resin guessing the mixture is a definite no no. I found that using a medicine cup was ideal for the hardener as it does measurements as small as 2.5ml up to 20ml, and when mixing epoxy resin don’t over do it, just mix small batches at once, if you mix large batches at once depending on the heat of the day you may find that it starts to go off before you get to the end of the mixture.
3) On a cold day such as we have here almost daily in New Zealand if mixing resin to fibre glass with then i found putting the resin minus the hardener into the microwave for 5 seconds to be helpful in allowing it to be more easily spreadable.
4) As much as you may think adding a little more strength here and a little more there is not such a big deal then think again. In my mind and what i’ve read weight is one of the major factors to a successful hovercraft and if you are following plans then stick to them as much as possible. When the plans say add 2 layers of fibre glass here then there is a reason for it , if they thought 3 or 4 layers where needed then they would of written 3 or 4 layers.
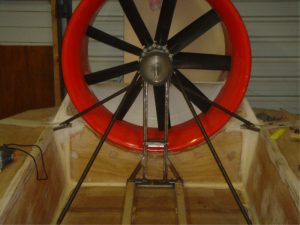
5) When creating your fan frame make it around 10mm lower than the central position and then space the pillow/plummer blocks up that 10 mm to get it central. That way in the future when things start to lose shape you have the adjustment available to compensate.
6) If using pillow/plummer blocks in the drive line like i have then mount the top one upwards and the lower one facing downwards that way you have adjustment later on.
7) If pouring urethane foam for your buoyancy tanks then make sure that at least two of you are doing it (makes life so much easier), wear gloves and do it on a hot or warm day not a cold one. If you do it on a colder day like i unfortunately did then you’ll use twice as much product and it wont spread to fill the gaps as well.
8) Keep in mind weight.
9) DO NOT make the fan frame from aluminium, it has been tried several times and it just doesn’t have the strength steel does and the welds WILL suffer from fatigue.
10) Skirt material must be able to : not tear easily, be waterproof, be light, and not deteriorate in the sun. I’m going with “polyester oxford” material which passes all my tests, this seems to be a material that no one I’ve asked has used for skirt material so i’ll keep you posted if its any good.
11) When checking the centre of gravity (CG) / centre of balance of your craft then measure the total length of your craft and find the half way point. Put a round pole under the half way point for it to balance on like a see saw. Have as much of the total weight that the craft will have before checking the CG, this includes the driver, fuel, battery etc etc. Shift the items around until the craft is balanced on the pole. there are calculations for this and a quick question in a hovercraft newsgroup should see you getting the calculation easily.
A hovercraft rides on a “bubble” of air, so to have the craft properly balanced is extremely critical. As you could imagine if you have it unbalanced then it could easily fall off the bubble or handle like a piece of s***.
12) Did i mention to keep in mind weight ?
13) Not specific to hovercrafts but i will mention that keeping and having a clean workshop / garage is such a huge advantage that you wont appreciate it unless you give it a try.
14) Enlarging the front holes of a hovercraft is one way to try and help prevent ‘plough in’ which is a apparently all too common problem in hovercrafts, but i advise you ask around first to see weather it applies to your make and model first.
15) Seal all plywood with a timber sealer before considering to paint over it.
16) This tip has been suggested by “Buck” a superwedge builder in Australia.
Buy lots of resin and hardener…..and when you have thought you have had enough…buy more. Even better, befriend someone in a government dept that uses epoxy resin for repairing things like bridges or culverts 🙂 Then do them a favor, and voila! Epoxy resin by the gallon.
17) It is possible to test your fan by starting the motor with the fan connected in the craft with no skirts on and not be pushed by the thrust along the floor and through the other end of your garage. Just make sure anything loose in the workshop is secured. (i was a bit reserved in doing this but finally bite the bullet and done it and it didn’t move at all, just blew the dust off my floor , i only brought it up to 2500rpm which was enough to test that things spun without damage.)
18) A adequate wire mesh guard that goes over the front of the duct is generally around 3mm thick wire with 50 by 50mm squares. Not only is its purpose to stop things flying through the fan but in the event of the fan flying to bits it needs to be strong enough to prevent the blades from flying towards your head.
19) Put a little thought into adding a towing/winch hook to the craft prior to painting it, as you may feel the need to add a little more support to that area prior to putting the decks on or painting it etc.
20) Today’s enlightenment = “Sanding is a pain in the ass” 🙂
21) If building a trailer along the shape and design that i have with angled sides, then provisions may be needed to allow the air to escape from under the craft as the craft is flying onto the trailer. My craft forms such a good seal between trailer sides and the inflated skirts that the air can’t get out and the craft then has no choice but to tilt dramatically. I’m currently adding breather holes to the rear of my trailer so that it has somewhere to let the air out but i have yet to provide enough holes to achieve the task.
22) With my craft i have no need to lock the motor in place so that when towing the blades don’t spin, but on a craft with a smaller motor and less compression i have heard that locking the flywheel or similar whilst towing the craft maybe needed. I have also made my craft so that i can lock the rudders in a straight ahead position for towing but have noticed that with the twin steering cables etc the rudders don’t move even at 100km/h. May be worth consideration on a craft with a less sturdy steering setup *shrug*
23) If i was to do it all again i think next time i would mix up a mixture of Q cell’s and spread it over the top decks of the craft and then scrap it all off again in the hope that the left over Q cells would fill up the grain of the plywood without adding buggar all weight to the craft. By doing that i’m thinking that the sanding process when getting it ready to paint would be a hell of a lot easier. (I recall from my time spent sanding the craft, that with every coat of primer etc the grain of the ply would noticeably show through and the longest part of sanding was trying to sand the grain marks smooth). If anyone try’s it and finds it worthwhile then feel free to let me know.
24) There are many calculators on the net for measuring blade tip speed but i thought i’d put the actual calculations on paper just in case you wanted to know how they get to working out the tip speed. The below calculations are for my particular fan set up but you can change the numbers to suit your craft.
Maximum Engine revs = 6200rpm
Gear Ration = 1.8:1
Fan diameter = duct internal size minus tip clearance, 944mm – 8mm (average of 4mm tip clearance either side = 8mm total) = 936mm
Calculation with the above figures is as follows:
6200 rpm/60 = 103.33 rps = engine speed
103.33/1.8 = 57.4rps = fan speed
Circumference = piD = PI x 0.936m = 2.93m
Tip speed m/s = dist x rps = 2.93 x 57.4rps = 168m/s
* ( rpm = revs per minute, rps = revs per second, PI = 3.14, m = Meters, m/s = Meters per second)
168meters per second tip speed is maximum allowed by multi wing for my 5zl blades and i’m currently trying to work out why my motor is revving to 6200rpm when it should only be revving to 4800rpm with my blades set to 45 degrees which in turn would lower my tip speed to 130m/s
I will add more of my useless tips as i think of them , in the meantime if you have some tips that you’d like added, maybe its a FAQ that your sick of answering or maybe its something you’ve noticed during construction or even think something I’ve put needs rethought then email me with subject “hovercraft tips”
OH and By the way, don’t forget to keep a watch on the weight of the craft 🙂


